
From the mind of Mihail – Fooling temperature controlled devices with relays and ESP32
In modern smart home automation there is often a need to integrate temperature-controlled devices that have no IOT capabilities at all. This article explores a creative approach using variable resistors and double pole double throw (DPDT) relays to inject switchable fake temperature readings into your system. By altering the sensor input, you can offset heating and cooling curves and even boost heating ahead of peak electricity hours—all with components costing only a few euros.
In this example we will be fooling the temperature sensor for a Jäspi Ecowatti hybrid electric heating system and gaining IoT control over the device that has none built in.
Understanding PT1000 and PT100 Sensors
PT1000 and PT100 sensors are among the most common temperature sensors used in industrial and domestic applications. Essentially, these sensors are resistors whose resistance value varies predictably with temperature. For instance, the PT100 sensor has a resistance of 100 ohms at 0°C and increases linearly with rising temperature, while the PT1000 operates on a similar principle with a baseline resistance of 1000 ohms. These sensors rely on active measurement circuitry to read the precise resistance values, converting them into a temperature reading. This active circuitry is the reason why a complete replacement—rather than a simple bypass—of the sensor with a fake resistance value is necessary when aiming to manipulate temperature readings.
The resistance tables can easily be looked up online and most heating systems come with an installation manual that contains the appropriate table.
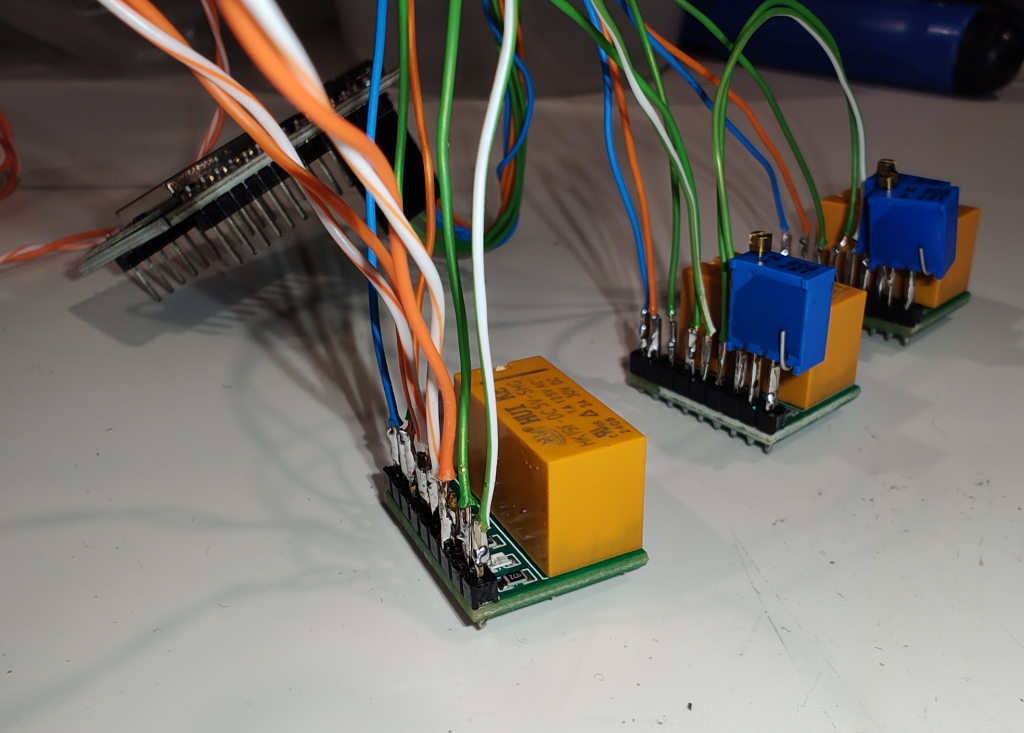
Multi turn trimmer pots are a good component to provide the resistance values. You can search for them on ali express with the keyword: “multi turn trimmer pot”

The Role of DPDT Relays in Temperature Control
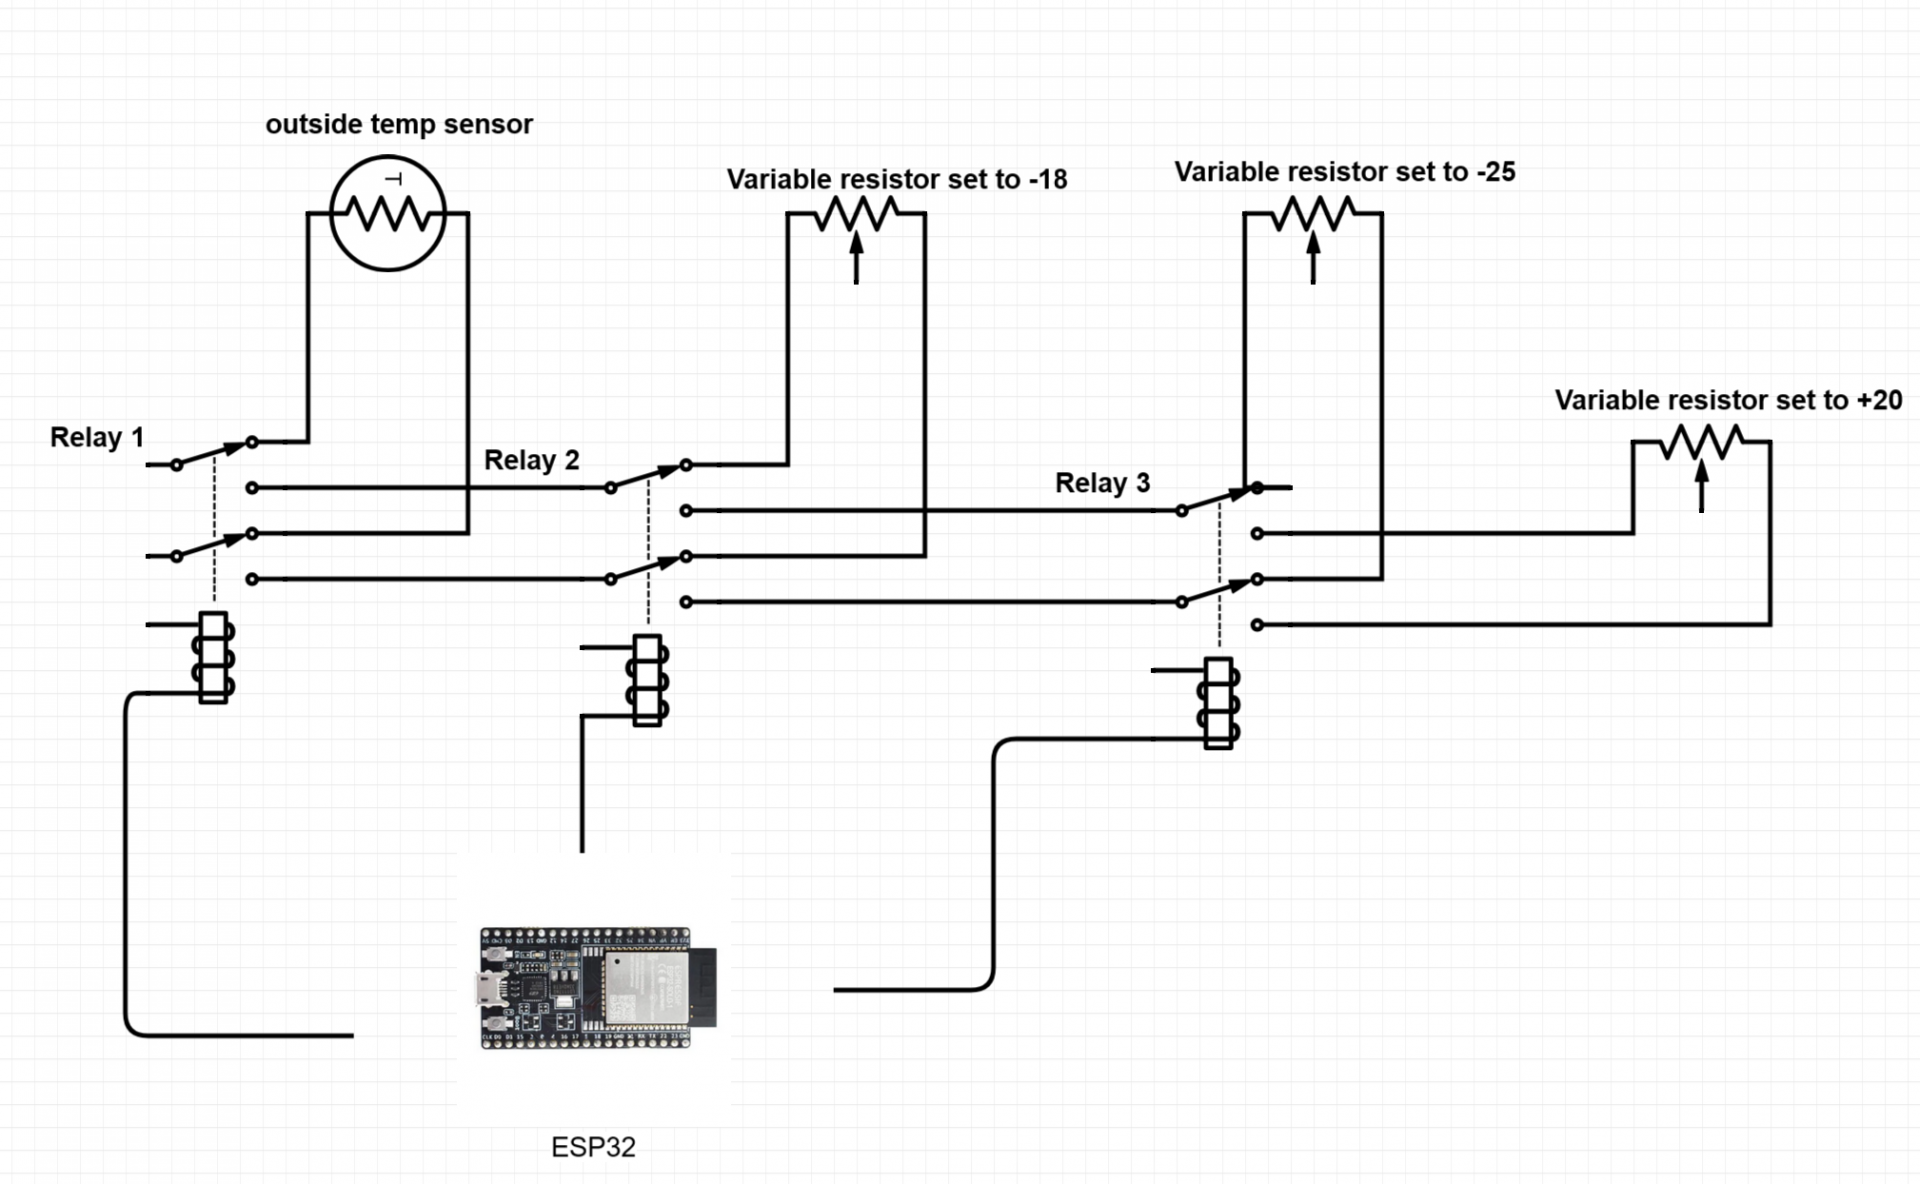
DPDT relays are ideal for this application because they can switch between two circuits, allowing you to completely replace the real temperature sensor with a circuit containing a variable resistor. When the relay is activated, it disconnects the original sensor and connects the fake resistor, providing a controllable, switchable resistance value that mimics a specific temperature. By using multiple DPDT relays in a chain, you can switch between several predefined resistance values, each corresponding to different temperature readings. In my schematic example, the system uses three relays to manage the real sensor value plus three additional fake values.
You can search for the correct relay type on ali express using the search keyword of “5v dpdt relay”

Chaining Relays for Multiple Temperature Values
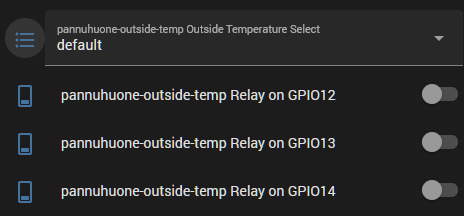
Chaining the relays allows for a flexible system capable of selecting from multiple preset temperature values. In the example provided, one relay ensures that the real sensor is normally connected, while the other three relay circuits can be toggled to simulate various temperature readings. This setup is controlled via an ESP32 microcontroller integrated with Home Assistant through ESPHome. By configuring the microcontroller to manage the relay states, the system can dynamically select which temperature value to feed into the heating control circuit.

Creating Temperature Offsets for Heating and Cooling
Most heating systems operate on a heating curve that calculates the required heat based on an outdoor temperature reading. By substituting this reading with a fake value, you can effectively create an offset. For example:
- Offsetting for Comfort: Feeding a slightly higher or lower temperature than the actual one adjusts the system’s response, ensuring optimal indoor climate control without stressing the heating system.
- Effective Shut-Off: Providing a fake reading of +20°C can essentially shut off the heating system by tricking it into thinking no additional heating is necessary. This is more effective than the built in relay operated away from home switch that lowers the heating by around 10°C.
- Boosting Heating: Conversely, feeding a cold temperature like -20°C can trigger a boost in heating, pre-emptively warming the home before expensive electricity price hours hit, thereby reducing the temperature drops.
This approach is not only efficient but also less stressful on the system components compared to turning the heating system off entirely.
Cost-Effective and Scalable Implementation
One of the significant advantages of this method is its low cost. The required components—relays and variable resistors—are inexpensive, often costing just a few euros each. This makes the solution highly scalable, allowing you to implement multiple fake temperature readings without a significant financial investment.
Failsafe Operation Considerations
Safety and reliability are paramount, especially when manipulating critical system inputs like temperature sensors. In the proposed design, failsafe operation is achieved by leveraging the normally open (NO) and normally closed (NC) contacts of the DPDT relays. The wiring is arranged so that, in the event of a power failure or system malfunction, the relay defaults to connecting the real temperature sensor. This ensures that the heating system always receives accurate temperature data, preventing unintended operation or system damage during a failure.
Schematic Overview
The schematic of this system is designed to clearly delineate the connections between the temperature sensor, variable resistors, DPDT relays, and the ESP32 microcontroller. Key aspects include:
- Sensor Integration: The real sensor is connected through a normally closed relay contact, ensuring its default operation.
- Relay Switching: Three additional relay circuits provide different resistance values from the variable resistors, each corresponding to a different fake temperature.
- Control Logic: The ESP32, programmed via ESPHome, controls the relay states based on inputs from Home Assistant. This modular design enables flexible switching between real and fake temperature values, tailored to the needs of the heating curve adjustments.
The relays require power (5V), ground and signal. The pinout for the relays is relatively standard.

The markings on the relay are easy to understand when you know what they mean.
NO – normally open
NC – normally closed
COM – common
IN – Signal for the relay to switch
VCC – input voltage of 5V
GND – Ground
In the default state Common is connected to normally closed and once the relay is energized it is switched to connect to normally open.

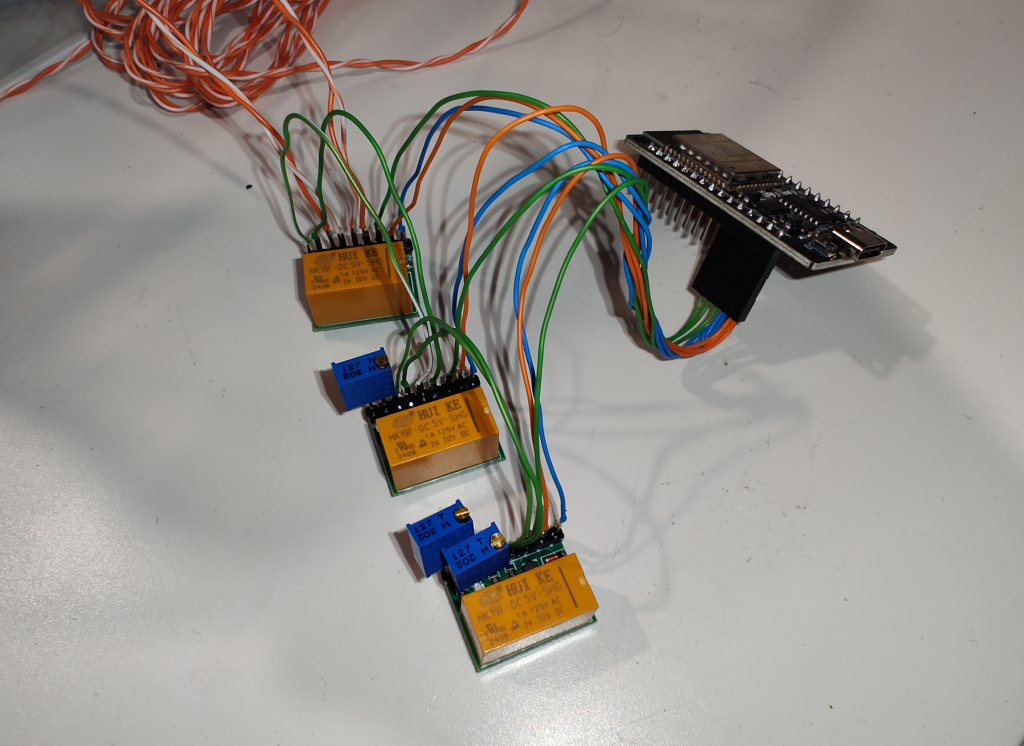
This is also a nice project to practice those soldering skills.
ESP32 Source Code Details
The ESP32 microcontroller acts as the brain of the system. The source code, written for ESPHome, manages the relay operations with precision. Key elements of the code include:
- Relay Control: Logic to switch each DPDT relay based on predetermined conditions or commands received from Home Assistant.
- Integration with Home Assistant: The code includes configurations that allow the ESP32 to communicate with Home Assistant, enabling remote control and monitoring of the system.
- Failsafe Measures: The code is designed to ensure that, in the event of a system fault, the relays revert to their default states, thereby reconnecting the real temperature sensor to maintain system safety.
esphome:
name: pannuhuone-outside-temp
friendly_name: pannuhuone-outside-temp
esp32:
board: esp32dev
framework:
type: arduino
# Enable logging
logger:
# Enable Home Assistant API
api:
encryption:
key: "Your encryption key"
ota:
- platform: esphome
password: "PASSWORD"
wifi:
ssid: !secret wifi_ssid
password: !secret wifi_password
# Enable fallback hotspot (captive portal) in case wifi connection fails
ap:
ssid: "Pannuhuone-Outside-Temp"
password: "FALLBACK PASSWORD"
captive_portal:
switch:
- platform: gpio
pin: GPIO12
id: relay_12
name: "Relay on GPIO12"
# inverted: false # Uncomment or remove if your relay logic is inverted
- platform: gpio
pin: GPIO13
id: relay_13
name: "Relay on GPIO13"
# inverted: false
- platform: gpio
pin: GPIO14
id: relay_14
name: "Relay on GPIO14"
# inverted: false
# --- Create a select entity to choose the "simulated" outside temp state ---
select:
- platform: template
name: "Outside Temperature Select"
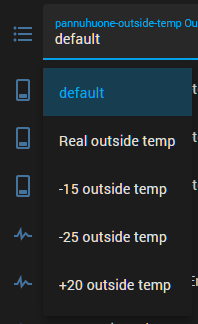
# The four states we want to show in Home Assistant:
options:
- "default"
- "Real outside temp"
- "-15 outside temp"
- "-25 outside temp"
- "+20 outside temp"
# Force a known startup choice
# initial_option: "Real outside temp"
# Don’t restore the last-used value from flash
restore_value: false
# Called whenever the select changes in Home Assistant
set_action:
- lambda: |-
if (x == "default") {
// All pins LOW
id(relay_12).turn_off();
id(relay_13).turn_off();
id(relay_14).turn_off();
} else if (x == "Real outside temp") {
// All pins LOW
id(relay_12).turn_off();
id(relay_13).turn_off();
id(relay_14).turn_off();
} else if (x == "-15 outside temp") {
// Pin 12 & 13 HIGH, pin 14 LOW
id(relay_12).turn_on();
id(relay_13).turn_on();
id(relay_14).turn_off();
} else if (x == "-25 outside temp") {
// Pin 13 & 14 HIGH, pin 12 LOW
id(relay_12).turn_off();
id(relay_13).turn_on();
id(relay_14).turn_on();
} else if (x == "+20 outside temp") {
// Pin 13 HIGH only
id(relay_12).turn_off();
id(relay_13).turn_on();
id(relay_14).turn_off();
}After adding the ESP module to home assistant you get a nice automatic select control and individual relay controls
This approach – combining hardware simplicity with smart software control—makes it an attractive solution for anyone looking to optimize their home’s heating and cooling system using IoT technology.
Building automation with this setup
Now that the building blocks are ready you can get creative with building automations.
Here is a simple example of what can be done:
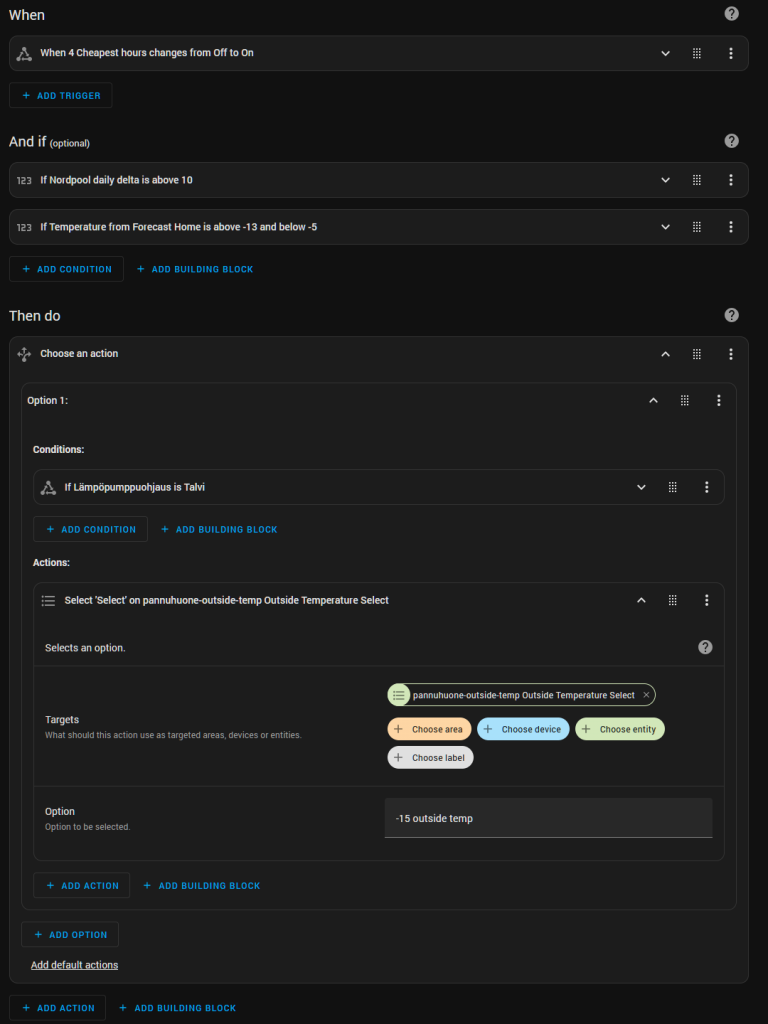
alias: sähkön hintaohjaus lämmitysboost halvat tunnit
description: ""
triggers:
  - entity_id:
      - binary_sensor.4_cheapest_hours
    from: "off"
    to: "on"
    trigger: state
conditions:
  - condition: numeric_state
    entity_id: sensor.nordpool_delta
    above: 10
  - condition: numeric_state
    entity_id: weather.forecast_home
    attribute: temperature
    below: -5
    above: -13
actions:
  - choose:
      - conditions:
          - condition: state
            entity_id: input_select.lampopumppuohjaus
            state: Talvi
        sequence:
          - action: select.select_option
            metadata: {}
            data:
              option: "-15 outside temp"
            target:
              entity_id: select.pannuhuone_outside_temp_outside_temperature_select
mode: single
By integrating these components, you can transform your home automation setup into a dynamic system that not only improves energy efficiency but also offers unprecedented control over your indoor environment.